Convert Multiple Photos into One 3D Model
Photograph one object from several angles and let the AI build a full 3D model from all of them. Extra views give it real evidence for the sides and back, so it has less to guess than a single photo.
- 2 to 4 views
- GLB, OBJ & STL export
- Watertight checks
Start with your best front photo
Free account, starter credits included. Export GLB, OBJ and STL.
Supports Multi-Angle Photos (2–4 Views) (up to 15MB)
How multi-image to 3D works
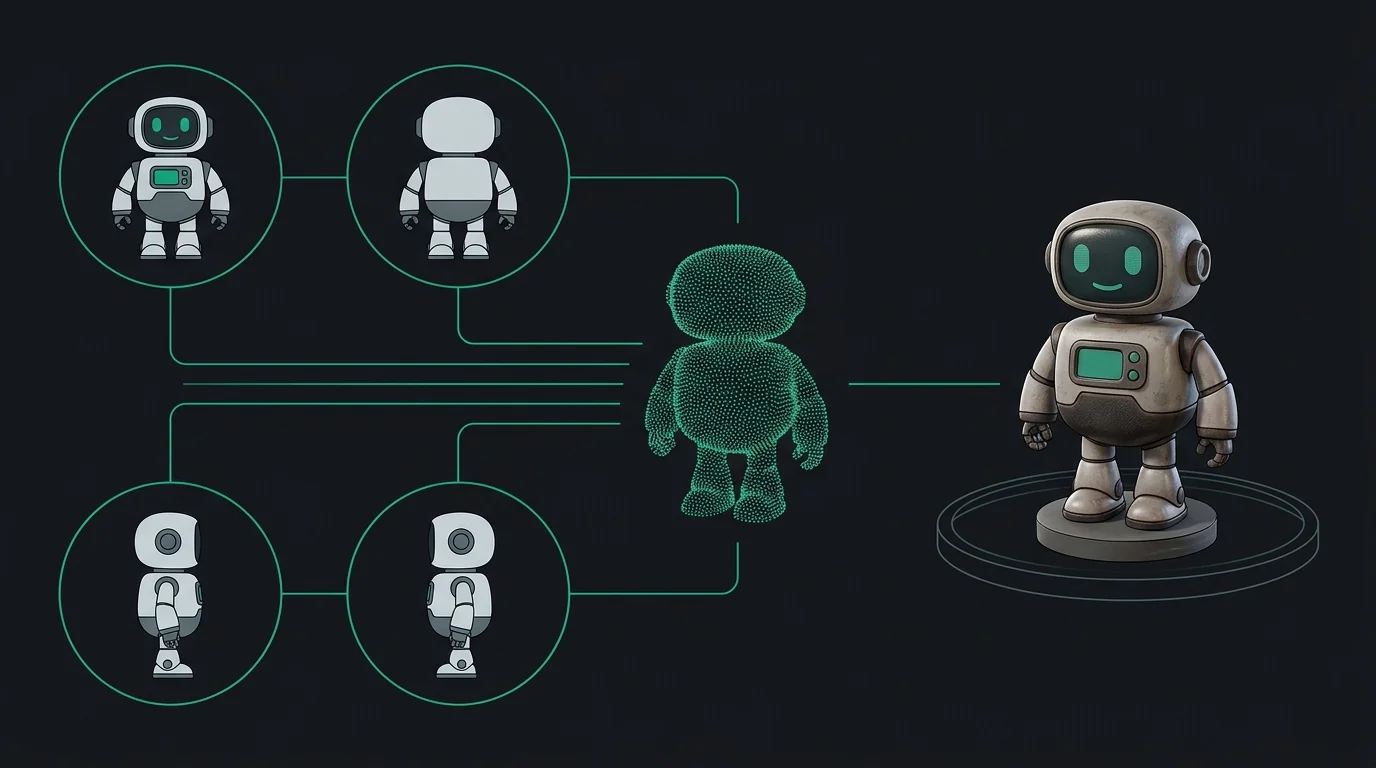
Capture 2 to 4 angles
Shoot the same object from the front, back and, if you can, the left and right sides. Keep distance, height and lighting consistent.
Upload the views
Add your front photo as the main view. Back and side photos act as extra reference for the hidden surfaces.
The model is reconstructed
The AI matches silhouettes and surface features across the views and builds a single 3D shape with textures.
Review and export
Inspect the model in the 3D viewer, then download GLB for web and AR, OBJ for Blender, or STL for printing.
Which angles to capture
More angles usually mean fewer guesses, but only if they are consistent. Start with front and back, then add sides for complex shapes.
Straight on, at the object's mid-height, whole object in frame.
A clean 180° turn from the front. Same distance and height.
A 90° turn. Helps with depth, profile and thin parts.
Opposite side. Most useful for asymmetrical objects.
Multi-Angle Photo Capture Guidelines
Consistent Lighting Across Angles
Keep illumination stable between shots. Soft, diffused daylight prevents shadow shifts between views from confounding neural feature alignment.
Fixed Object Posture
Ensure the subject does not move or deform between captures. Rotate the camera around the object rather than rotating articulated limbs.
Opposite 180° Angle Pair
For 2-image conversions, provide a clean front view and an exact 180-degree rear view for maximum geometric stability.
Clean High-Contrast Backdrop
Use a neutral white, grey, or plain backdrop to assist automated AI foreground segmentation across all camera angles.
Why one photo is rarely enough for a full 3D model
A single photo only shows one side of an object. Everything else, including the back, the underside and the far edge, has to be inferred from patterns the model learned in training. For simple, symmetrical items that often works. For branded products, custom characters or anything asymmetrical, it tends to produce soft, distorted or invented surfaces.
Multi-view input changes the problem. When the back and sides are supplied as real photos, the model matches them against the front instead of inventing them, which generally gives more faithful proportions and more believable textures on the hidden faces.
Results still depend on photo quality. Sharp, evenly lit images with a plain background and a consistent camera position give the model the cleanest signal to work from.
Single photo vs multiple photos
| What you compare | Single photo | Multiple views |
|---|---|---|
| Back and side surfaces | Inferred from training data | Matched against your reference photos |
| Logos, labels and text on the rear | Often blurry or invented | Can follow what the back photo shows |
| Asymmetrical shapes | Tend to be mirrored or averaged | Easier to keep accurate |
| Capture effort | One photo | Two to four consistent photos |
| Best for | Quick drafts, simple or symmetrical subjects | Products, characters, props and prints |
Getting better results from multi-view input
Small habits in how you shoot make a larger difference than any setting.
Choosing how many photos
Two photos (front and back) is the fastest upgrade over a single image. Add the left and right views when the object has depth, thin parts or different sides. Past four views, consistency matters more than quantity.
Lighting and background
Soft, even light and a plain backdrop keep shadows from being read as shape. Keep the light direction the same in every photo, or move the camera rather than the object.
Common mistakes
Changing zoom between shots, moving or re-posing the object, mixed backgrounds, and cropping part of the subject are the most frequent causes of uneven results.
Picking an export format
Use GLB for websites, AR and game engines, OBJ with materials for Blender or ZBrush, and STL when the model is headed for a slicer and a 3D printer.
Who Uses Multi-Image to 3D Generation?
E-Commerce & Shopify Merchandisers
Convert 4-angle product catalog photos into interactive 3D WebGL models for 360° product inspection and mobile AR.
Indie Game Studios & Modders
Transform multi-angle character turnaround sheets and prop blueprints into textured 3D base meshes for Unreal Engine and Unity.
Tabletop Miniature Makers & 3D Printers
Generate STL figurines from front and back photographs, then check wall thickness, overhangs and supports in your slicer before printing.
Digital Sculptors & VFX Artists
Generate a base mesh from real-world references to speed up sculpting in Blender and ZBrush. Models export in arbitrary units, so set the scale yourself.
Software & Engine Compatibility
Blender & ZBrush
Import multi-view OBJ & GLB meshes with clean UV coordinate unwrapping and paired MTL materials for sculpting.
Shopify & WebGL
Embed compact GLB models directly into web product pages for interactive 360-degree rotation and mobile AR.
Bambu Studio, OrcaSlicer & Cura
Load the STL into your slicer and run its checks before printing. Thin walls and small parts can still need attention.
Related guides
Frequently asked questions
Ready to build your model?
Create a free account, upload your best photo and export a 3D model in GLB, OBJ or STL.
Get Started