Convert Front & Back Images into a Full 3D Model
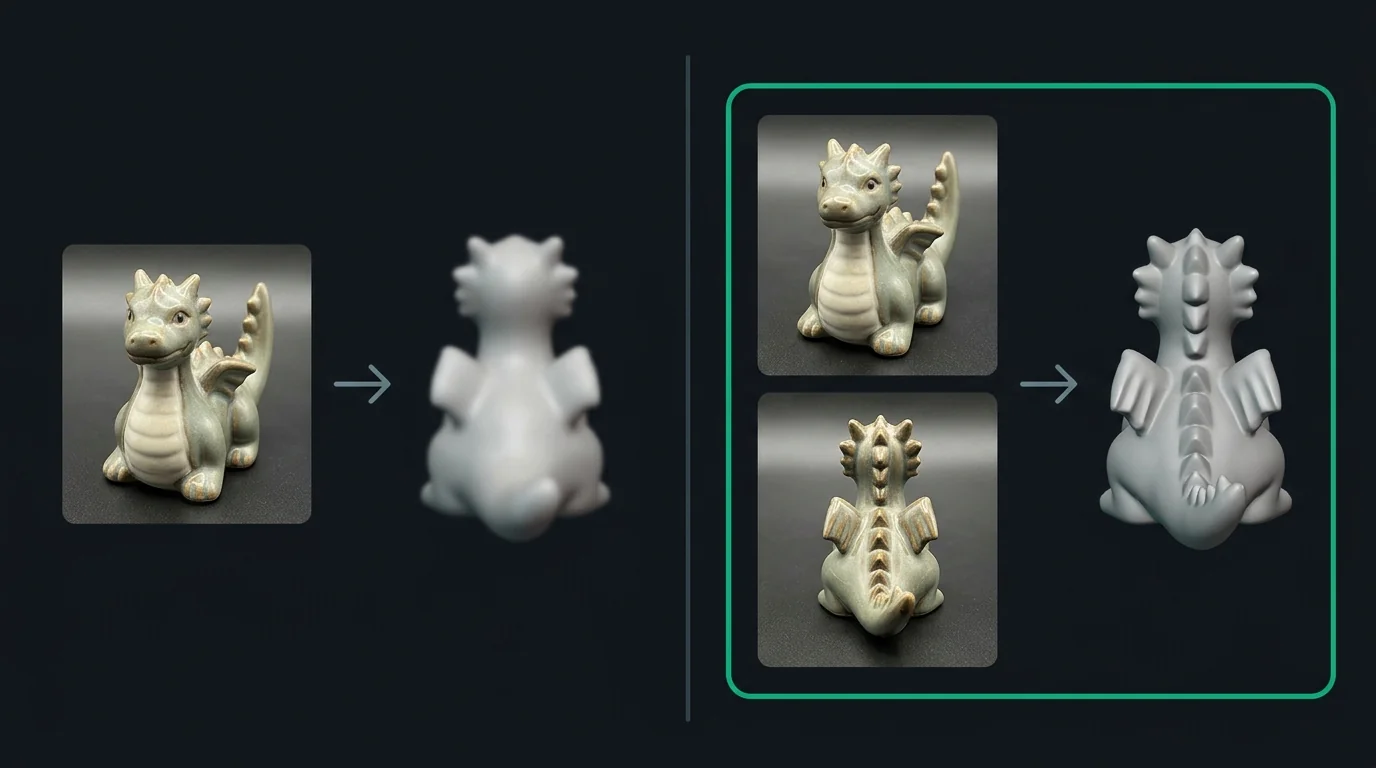
Have just a front and a back photo? Two opposite views already remove the biggest guess a single-image tool has to make. Upload both and get a full 3D model.
- 2 to 4 views
- GLB, OBJ & STL export
- Watertight checks
Start with your front photo
Free account, starter credits included. Export GLB, OBJ and STL.
Supports Front & Back Photos (2 Images) (up to 15MB)
How front and back to 3D works
Take a matching pair
Photograph the object from the front, then turn it exactly 180° and take the back. Keep distance, height and lighting identical.
Upload both images
Mark the front as the main view and add the back as the rear reference.
The two views are fused
The AI aligns the front and back silhouettes and fills the thin side areas between them.
Check and export
Rotate the model to inspect the back, then download GLB, OBJ or STL.
How to shoot a good front and back pair
Two views only work if they match. A clean 180° turn and consistent framing matter more than image resolution.
Straight on, object centered and fully in frame.
Rotate the object or camera a clean half turn. Same pose.
Same distance, focal length and height in both shots.
Soft, even light and a plain background in both.
How to Shoot or Draw a Good Front/Back Pair
Exact 180° Opposite Views
Rotate the camera (or the turntable) a clean half-turn between shots. The back view should be a true mirror of the camera position, not a three-quarter angle.
Same Distance, Height, and Framing
Keep focal length, camera height, and subject scale identical in both images so the silhouettes line up.
Neutral Background and Even Light
A plain background and soft light keep shadows from being read as geometry and make cutout clean on both views.
Same Pose in Both Images
Do not move limbs, props, or loose parts between the two shots. For characters, use a relaxed A-pose in both.
The backside problem with single-image 3D
Single-image generators never see the back of your subject. They fill it in from learned patterns, which is why backs often come out blurry, mirrored from the front, or missing straps, logos and hair.
A real back photo removes that biggest guess. The model matches the front and back views and only has to interpolate the narrow sides between them. Two images is the lowest-effort upgrade you can make over a single upload.
For objects with deep sides or complicated shapes, adding left and right views usually improves the result further. Our multi-image page covers the four-view workflow.
One image vs front and back
| What you compare | Single photo | Multiple views |
|---|---|---|
| Back surface | Invented from patterns | Follows the back photo |
| Rear details | Often missing or blurry | Can be preserved |
| Side regions | Estimated | Interpolated between two views |
| Capture effort | One photo | Two matching photos |
| Best for | Quick drafts | Figurines, props and items you will print |
Tips for front and back results
Keep both views as similar as possible.
Turntable or fixed camera
The easiest method is a tripod with the object on a turntable. Rotate exactly half a turn between shots so framing and lighting stay identical.
Keep the pose identical
Do not move limbs, props or loose parts between shots. For characters, use the same relaxed A-pose in both images.
When to add side views
Add left and right photos if the object is deep, has thin protruding parts, or looks different from each side.
Preparing for 3D printing
For printing, export STL and run it through your slicer's checks. Thin parts, tiny gaps and floating pieces can still need attention.
When a Front/Back Pair Is Enough
3D Printed Figurines
Turn front and back artwork of a character into a printable STL without an incorrect or blank backside.
Game Props and Characters
Block out a base mesh from a front and back concept drawing, then refine in Blender.
Merch, Plushies, and Collectibles
Preview a product from two photos before committing to a full multi-angle shoot.
Fixing a Bad Single-Image Result
If a one-image conversion got the back wrong, add the back photo and regenerate instead of hand-sculpting.
Export and Software Compatibility
Blender & ZBrush
OBJ and GLB import for retopology, sculpting, and texture touch-ups.
Cura, PrusaSlicer, Bambu Studio & OrcaSlicer
Load the STL into your slicer and run its checks. Thin parts and small gaps can still need attention.
Web, AR & Game Engines
GLB (glTF 2.0) loads in Godot, Unity via glTFast, Three.js, and Google model-viewer.
Related guides
Frequently asked questions
Ready to build your model?
Create a free account, upload your best photo and export a 3D model in GLB, OBJ or STL.
Get Started